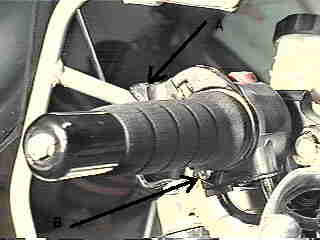
 What you do is get the Vista-Cruise throttle lock with the long extension
that is supposed to go to the cables or something. You want the long one
so you will have material to work with. The 'wide view' picture shows the
throttle lock in place from the bar end. The upper arrow (A)
points to the
thumb control. Be careful that this thing doesn't hit your gas tank when
the bars are turned and the lock is on or off.
(Got my ZX, so I learned from that)
The bottom arrow (B) points to the screw you'll have to add.
What you do is get the Vista-Cruise throttle lock with the long extension
that is supposed to go to the cables or something. You want the long one
so you will have material to work with. The 'wide view' picture shows the
throttle lock in place from the bar end. The upper arrow (A)
points to the
thumb control. Be careful that this thing doesn't hit your gas tank when
the bars are turned and the lock is on or off.
(Got my ZX, so I learned from that)
The bottom arrow (B) points to the screw you'll have to add.
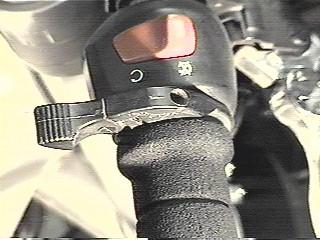 The 'Top view' picture is just a 'Gee Whiz' shot, shows how it should look
when you're done. The 'Close view' picture shows the screw you have to
add. This is the key to the whole deal. From the picture you can see where
it goes.
The 'Top view' picture is just a 'Gee Whiz' shot, shows how it should look
when you're done. The 'Close view' picture shows the screw you have to
add. This is the key to the whole deal. From the picture you can see where
it goes.
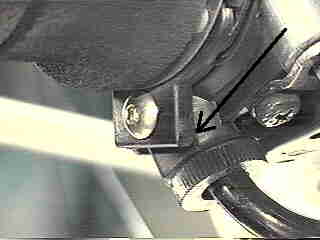 You will have to drill the throttle lock and tap it for 10-32 or 8-32,
whatever you have. You will also drill the throttle assembly for a
pass-thru of the size you selected. The screw will tighten into the
throttle lock and fit loosely into the throttle assembly. This is what
prevents the lock from turning. It needs to fit without excess movement,
but still free. The arrow points to the place where you will have to cut
off the projection that comes on the lock.
You will have to drill the throttle lock and tap it for 10-32 or 8-32,
whatever you have. You will also drill the throttle assembly for a
pass-thru of the size you selected. The screw will tighten into the
throttle lock and fit loosely into the throttle assembly. This is what
prevents the lock from turning. It needs to fit without excess movement,
but still free. The arrow points to the place where you will have to cut
off the projection that comes on the lock.
I'm afraid this isn't a step by step procedure, but it does reflect how I work. If you monkey around slowly and carefully, you get the job done. Better the next time, better the time after that. This is my third one this year, I think. I hope this helps...